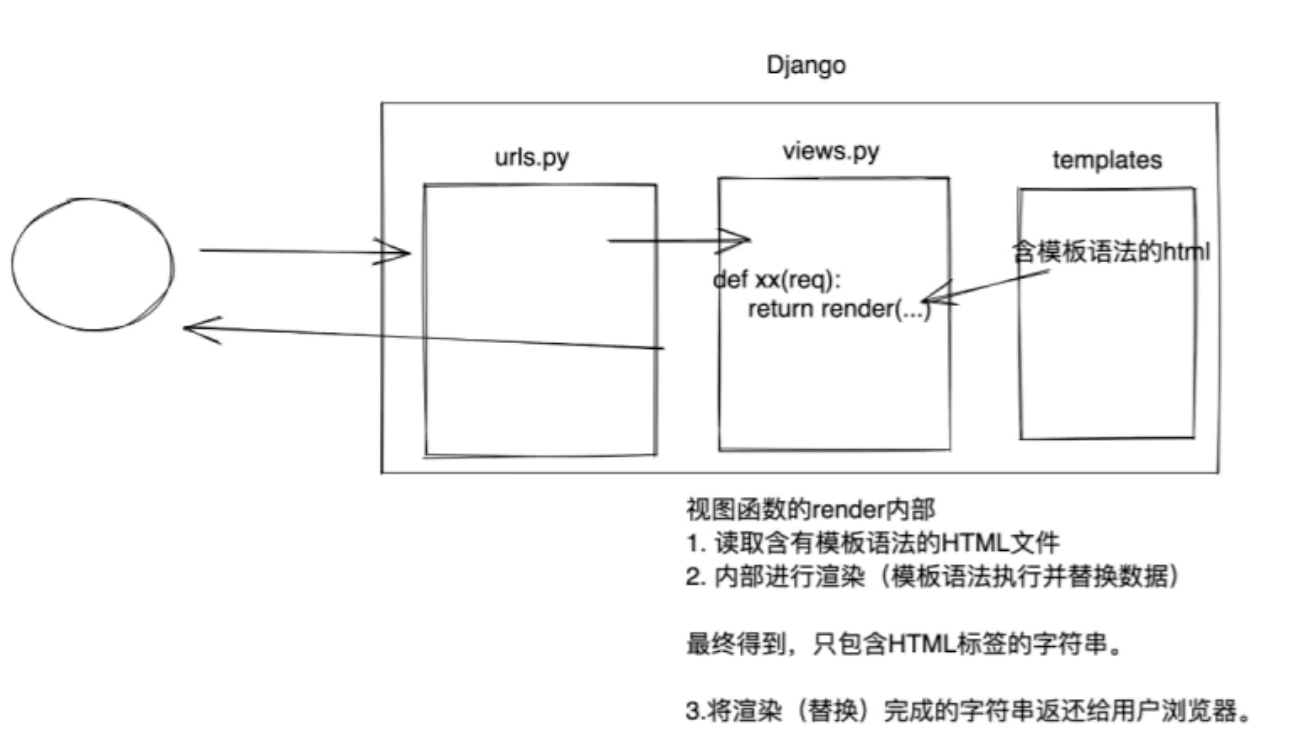
Django-请求参数和响应方式
0x01 请求和响应的方式
def something(request):
    # 关于request:是一个对象封装了用户发送过来的所有请求数据

    # 获取用户请求方式,GET/POST
    print(request.method)
    # 获取GET参数
    print(request.GET)
    # 获取POST参数
    print(request.POST)
    # 获取GET中的a参数
    print(request.GET['a'])

    # 响应方式1.通过render方式,通过html模板输出
    return render(request,"something.html")
    # 响应方式2.通过HttpResponse方式,直接返回内容
    return HttpResponse(request.GET['a'])
    # 响应方式3.通过redirect方式,重定向链接
    return redirect("https://www.baidu.com")
0x02 一个简单的登录界面示例
login.html部分:
这边需要注意一定要在form表单上加一句{% csrf_token %}
<!DOCTYPE html>
<html lang="en">
<head>
    <meta charset="UTF-8">
    <title>Login</title>
</head>
<body>
    <h1>用户登录</h1>
    <form method="post" action="/login/">
            {% csrf_token %}
            <input type="text" name="user" placeholder="用户名">
            <input type="password" name="passwd" placeholder="密码">
        <input type="submit" value="提交">
    </form>
    <span style="color: red"> {{ error_msg }}</span>
</body>
</html>
views.py login方法部分:
def login(request):
    if request.method == "GET":
        return render(request, "login.html")
    elif request.method == "POST":
        username = request.POST['user']
        password = request.POST['passwd']
        if username == "root" and password == "123456":
            return HttpResponse("登陆成功")
        else:
            error_msg = "登录失败,用户名或者密码错误"
            return render(request, "login.html", {"error_msg": error_msg})
标签: django
Django-HTML模板继承
制定一个模板文件 layout.html 模板文件内容如下:
{% load static %}
<!DOCTYPE html>
<html lang="en">
<head>
    <meta charset="UTF-8">
    <title>{% block title %}{% endblock %}</title>
    <link rel="stylesheet" href="{% static 'plugins/bootstrap-3.4.1/css/bootstrap.min.css' %}">
</head>
<body>

 <!-- 导航条内容 -->
<nav class="navbar navbar-default"></nav>

<!-- 主体部分使用{% block content%}{% endblock %}-->
<div class="container">{% block content%}{% endblock %}</div>

<script src="{% static 'js/jquery-3.5.1.min.js' %}"></script>
<script src="{% static 'js/popper-1.16.1.min.js' %}"></script>
<script src="{% static 'plugins/bootstrap-3.4.1/js/bootstrap.min.js' %}"></script>
</body>
</html>
继承后的子页面写法如下:
<!-- 继承layout.html页面 -->
{% extends 'layout.html' %}

<!-- 向block里面填写内容 -->
{% block title %}部门列表{% endblock %}

{% block content %}
<div>
这里子页面的主体内容
</div>
{% endblock %}
标签: django
Django-HTML模板语法
0x01 解释
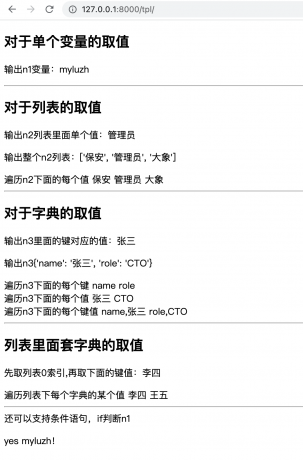
本质上:在html中写一写占位符,后面由数据对这些占位符进行替换处理。

0x02 views.py下面的tpl方法:
def tpl(request):
    # 单个变量
    name = "myluzh"
    # 列表
    roles = ["保安", "管理员", "大象"]
    # 字典
    user_info = {"name": "张三", "role": "CTO"}
    # 列表里面套字典
    user_list = [
        {"name": "李四", "role": "CFO"},
        {"name": "王五", "role": "UFO"},
    ]
    return render(request, "tpl.html", {"n1": name, "n2": roles, "n3": user_info, "n4": user_list}, )
0x03 模板文件tpl.html内容:
<!DOCTYPE html>
<html lang="en">
<head>
    <meta charset="UTF-8">
    <title>Title</title>
</head>
<body>
    <h2>对于单个变量的取值</h2>
    <p>输出n1变量:{{ n1 }}</p>

    <hr>
    <h2>对于列表的取值</h2>
    <p>输出n2列表里面单个值:{{ n2.1 }}</p>
    <p>输出整个n2列表:{{ n2 }}</p>
    <div>
        遍历n2下面的每个值
        {% for i in n2 %}
            <span>{{ i }}</span>
        {% endfor %}
    </div>

    <hr>
    <h2>对于字典的取值</h2>
    <p>输出n3里面的键对应的值:{{ n3.name }}</p>
    <p>输出n3{{ n3 }}</p>
    <div>
        遍历n3下面的每个键
        {% for i in n3.keys %}
            <span>{{ i }}</span>
        {% endfor %}
        <br>
        遍历n3下面的每个值
        {% for i in n3.values %}
            <span>{{ i }}</span>
        {% endfor %}
        <br>
        遍历n3下面的每个键值
        {% for k,v in n3.items %}
            <span>{{ k }},{{ v }}   </span>
        {% endfor %}
    </div>

    <hr>
    <h2>列表里面套字典的取值</h2>
    <p>先取列表0索引,再取下面的键值:{{ n4.0.name}}</p>
    遍历列表下每个字典的某个值
    {% for item in n4 %}
        <span>{{ item.name }}</span>
    {% endfor %}

    <hr>
    还可以支持条件语句,if判断n1
    {% if n1 == "myluzh" %}
        <p>yes myluzh!</p>
    {% else %}
        <p>no!</p>
    {% endif %}
</body>
</html>
标签: django
Django-安装与目录详解
0x01 安装django
pip install django
0x02 创建一个django项目
注意:当前在哪个目录项目就会在当前目录下创建
注意:django-admin文件位于python安装目录下的script里面
django-admin.exe startproject djangoProject
0x03 创建APP
创建django项目后自动会创建个跟项目同名的APP,如果想在项目内创建多个APP,可以进入django项目下创建
python3 manage.py startapp app01
0x04 注册APP
需要在settings.py中注册刚刚创建的app01
INSTALLED_APPS = [
'app01.apps.App01Config'
]
0x05 编写URL与视图函数对应关系,urls.py
from django.urls import path
from app01 import views
urlpatterns = [
path('index/', views.index),
]
0x06 app01 views.py 写方法并返回内容
from django.shortcuts import render,HttpResponse
返回http请求
def index(request):
return HttpResponse("app01 index")
返回templates目录下面找user_list.html文件
def user_list(request):
return render(request,"user_list.html")
0x07 启动django项目
python3 .\manage.py runserver
0x08 templates模板目录
1.在app目录下创建templates文件夹,这里放的就是html模板
0x09 static静态文件位置
1.在app目录下创建static文件夹
2.引入静态文件
settings.py配置了静态文件目录,所以后面在html中引入静态文件可以用如下方式:
{% load static %}
<img src="{% static "img/1.jpg" %}">
标签: django
python 批量修改AD域控登录账号脚本
2023-4-2 myluzh
1.需要在AD域控服务器安装OpenSSH
2.脚本同级目录需要有 人员.csv 内容包括(新账号,旧账号,姓名)
例如:10003105,JS106931,张三
import paramiko
import logging
import os

class AD:

    def __init__(self):
        self.ad = "jsjd.local"

    def modifySamA(self, new_jsid, old_jsid, name):
        logger.info(f"ModifySamA,current:{new_jsid},{old_jsid},{name}")
        try:
            client = paramiko.SSHClient()
            client.load_system_host_keys()
            client.set_missing_host_key_policy(paramiko.AutoAddPolicy())
            self.ad = "jsjd.local"
            client.connect('10.1.26.21', 22, username='administrator', password='Aa88776655', timeout=5)
            logger.info(f"ADserver {self.ad} 连接成功")
        except:
            logger.error(f"ADserver {self.ad} 连接失败")
            exit()
        c = f"powershell.exe \"Set-ADUser \'{old_jsid}\' -UserPrincipalName \'{new_jsid}@{self.ad}\' -SamAccountName \'{new_jsid}\'\" && echo success"
        stdin, stdout, stderr = client.exec_command(c)
        info = stdout.read().decode('gbk') + stderr.read().decode('gbk')
        info = info.replace("\n", "").replace("\r", "").replace(" ", "")
        if "success" in info:
            logger.info(f"成功:已修改{old_jsid}对象为{new_jsid}@{self.ad}")
        elif "无法" in info and "找到" in info:
            logger.warning(f"失败:无法找到{name},{old_jsid}对象。")
        else:
            logger.warning(f"失败:{info}")
        client.close()

if __name__ == "__main__":
    # 格式化logging日志模块
    logger = logging.getLogger('rplog')
    logger.setLevel(level=logging.DEBUG)
    formatter = logging.Formatter('%(asctime)s - %(filename)s[line:%(lineno)d] - %(levelname)s: %(message)s')
    file_handler = logging.FileHandler(os.path.basename(__file__).split(".")[0] + "_running.log")
    file_handler.setLevel(level=logging.INFO)
    file_handler.setFormatter(formatter)
    stream_handler = logging.StreamHandler()
    stream_handler.setLevel(logging.DEBUG)
    stream_handler.setFormatter(formatter)
    logger.addHandler(file_handler)
    logger.addHandler(stream_handler)

    #开始
    logger.info(f"脚本开始")

    AD = AD()
    ad = open("人员.csv")

    # 新工号,旧工号,名字
    # AD.modifySamA("10003105", "JS106931", "鲁籽杭")

    for a in ad.readlines():
        a = a.replace("\n", "").replace("\r", "").replace(" ", "")
        a = a.split(',')
        AD.modifySamA(a[0], a[1], a[2])

    logger.info("结束")
    exit()
python web自动化 selenium 开局代码
2023-4-2 myluzh
chromedriver()函数,自动安装驱动
import random
import time
from selenium import webdriver
from selenium.webdriver.chrome.service import Service
from selenium.webdriver.common.by import By
from webdriver_manager.chrome import ChromeDriverManager

def chromedriver():
    chromedriver_path = ChromeDriverManager().install()
    return chromedriver_path

def main():
    option = webdriver.ChromeOptions()
    option.add_argument('--disable-gpu')
    # option.add_argument('--incognito')  # 无痕模式
    # option.add_argument('--headless')  # 无头模式
    option.add_argument('window-size=320x627')
    option.add_argument('--start-maximized')
    option.add_argument('--ignore-certificate-errors')  # 忽略证书错误
    s = Service(chromedriver())
    browser = webdriver.Chrome(options=option, service=s)
    browser.implicitly_wait(10)
    browser.get('https://www.baidu.com')
    time.sleep(1)
    # browser.find_element(By.XPATH, "//[@id='input_username']").send_keys("1")
    # browser.find_element(By.XPATH, "//*[@id=\"btn_login\"]").click()

if __name__ == "__main__":
    main()
python pyinstaller打包成exe
2022-9-20 myluzh
打包命令
pyinstaller -F -w main.py -i main.ico --workpath build路径 --distpath exe打包路径 -n exe名字
主要参数
-F, --onefile 打包一个单个文件,如果你的代码都写在了一个py文件的话,可以使用这个命令,如果是多个py文件,就别用;
-D, --onedir 打包多个文件,在dist中生成很多依赖文件,适合以框架的形式编写工具代码,代码易于维护;
-a, --ascii 不包含unicode编码的支持(包括默认值:如果可用)
-c, --console 使用控制台子系统执行(默认),只对windows有效
-w, --windowed, --noconsole 使用windows子系统执行,当程序启动的时候不会打开命令行(只对windows有效)
-i , --icon=<File.ico>将file.ico添加为打包的exe文件的图表,只对windows系统有效
--icon=<File.exe,n>将file.exe的第n个图标添加为可执行文件的资源,只对windows系统有效
-n Name,--name=Name 可选的项目,生成的.spec文件的名字和exe名字
-p 设置导入路径(和使用PYTHONPATH效果相似),可以使用路径分隔符(windows使用分好,linux使用冒号),制定多个目录的时候可以指定多个-p参数来设置,让pyinstaller自己去找程序的资源
--key KEY 用于加密Python字节码的密钥
--add-data 可以将一些非二进制文件添加到exe文件中进行打包,参数为格式为static;static
--distpath 指定打包后的程序存放目录,exe文件默认存放在当前目录下的dist目录中
--workpath 为输出的所有临时文件指定存放目录,默认为当前目录下的build目录
标签: python pyinstaller
python计算思科交换机出厂时间
2022-9-16 myluzh
1.在交换机命令行运行show version 查看交换机的sn码
System serial number : FOC1723W0VP
2.SN码取出第四位至七位
以 FOC1723W0VP 为例
第四和第五位代表年份,第六和第七位代表当年的第XX周 (范围是01至52周)
17+1996=2013 ; 23周 (注:年份都是以1996为基础,进行相加)
因此便知这台交换机出厂时间为2013年的第23周
CTH — Celestica – Thailand
FOC — Foxconn – Shenzhen, China (深圳-富士康)
JAB — Jabil – Florida
JPE — Jabil – Malaysia
JSH — Jabil – Shanghai , China
TAU — Solectron – Texas (德州)
PEN — Solectron – Malaysia
while True:
    sn = input("sn:")

    year = 1996 + int(sn[3] + sn[4])
    week = int(sn[5] + sn[6])
    print(str(year) + "/" + str(week))
python paramiko模块 连接ssh
2022-9-15 myluzh
0x01 连接到linux ssh并执行命令
import paramiko
try:
    client = paramiko.SSHClient()
    client.set_missing_host_key_policy(paramiko.AutoAddPolicy())
    client.connect('10.1.123.218', 22, username='admin', password='1234123', timeout=5)
    # print("连接成功")
except:
    logger.info("连接ssh超时")
    exit()
command = "whoami"
stdin, stdout, stderr = client.exec_command(command)
for std in stdout.readlines():
    print(std)
0x02 连接到windows ssh并执行命令
因为windows的ssh是gbk所以有点麻烦,参考链接:paramiko连接windows10详解,远程管理windows服务器 https://www.cnblogs.com/machangwei-8/p/15215092.html
import paramiko
try:
    client = paramiko.SSHClient()
    client.load_system_host_keys()
    client.set_missing_host_key_policy(paramiko.AutoAddPolicy())
    client.connect('10.6.10.19', 22, username='administrator', password='Aa123..', timeout=5)
    # print("连接成功")
except:
    logger.info("连接ssh超时")
    exit()
command = "whoami"
stdin, stdout, stderr = client.exec_command(command)
info = stdout.read().decode('gbk') + stderr.read().decode('gbk')
print(info)
python环境迁移_python依赖包整体迁移方法
2022-8-11 myluzh
1.新建site-packages目录,进入到site-packages目录下;
2.在site-packages目录下执行pip freeze >requirements.txt;
3.查看requirements.txt,可以看到当前机器的python所有依赖包已生成列表
4.在当前目录下执行pip download -rrequirements.txt,可以看到pip开始下载依赖包列表中的所有依赖包
5.等待下载完成后,可以看到当前目录下已经有了依赖包文件
6.将site-packages文件夹打包,移动至我们需要这些依赖包的机器上;
7.在当前机器的site-packages目录下执行:pip install --no-index --find-links=/xxx/xxx/site-packages -r /xxx/xxx/site-packages/requirements.txt
(其中:/xxx/xxx/site-packages是指定依赖包路径,/xxx/xxx/site-packages/requirements.txt是指定依赖包列表路径);
8.执行pip list,查看当前pip安装的所有python依赖库,可以看到我们迁移过来的库已经安装成功了
